It never bursts at a convenient time. One minute you’re making a cuppa; the next, your kickboards are doing laps. The usual villain? A braided stainless-steel flexi hose lurking under the sink or behind the loo.
They’re handy, cheap, and—after a few sizzling summers and steamy cupboards—notorious for failing. The fix isn’t heroic; it’s routine: inspect, replace early, and fit them right.
General info for Australian homes. Gas, hot-water work, concealed pipework, and anything you’re unsure about = licensed plumber territory.
What They Are (and Why They Love to Fail)
Think of a flexi hose as a rubber tube wearing a metal jumper. The inner EPDM rubber carries the water; the outer braid protects it—until heat, chlorine, vibration, or a dodgy install say otherwise. Add a cupboard that’s basically a sauna and a hose bent like a boomerang, and you’ve got a tiny time bomb.
Where to look first:
Kitchen mixer (hot & cold), vanity mixer, toilet cistern inlet, laundry tub, washing machine, fridge water line.
Now, the tell-tale signs—because “she’ll be right” is not a burst-prevention strategy:
| What you see | What it means | What to do |
| Rust or green/white crust on braid or nuts | Moisture + corrosion at fittings | Replace now |
| Bulge in the braid | Inner rubber is perishing | Replace yesterday |
| Frayed/broken wires | Mechanical damage; high burst risk | Replace immediately |
| Kink/twist | Weak point forming, restricted flow | Re-route or replace |
| Brown water stains in the cupboard | Slow weep over time | Track source & replace |
| No date tag / looks older than your kettle | Past the typical 5–10-year life | Proactive replacement |
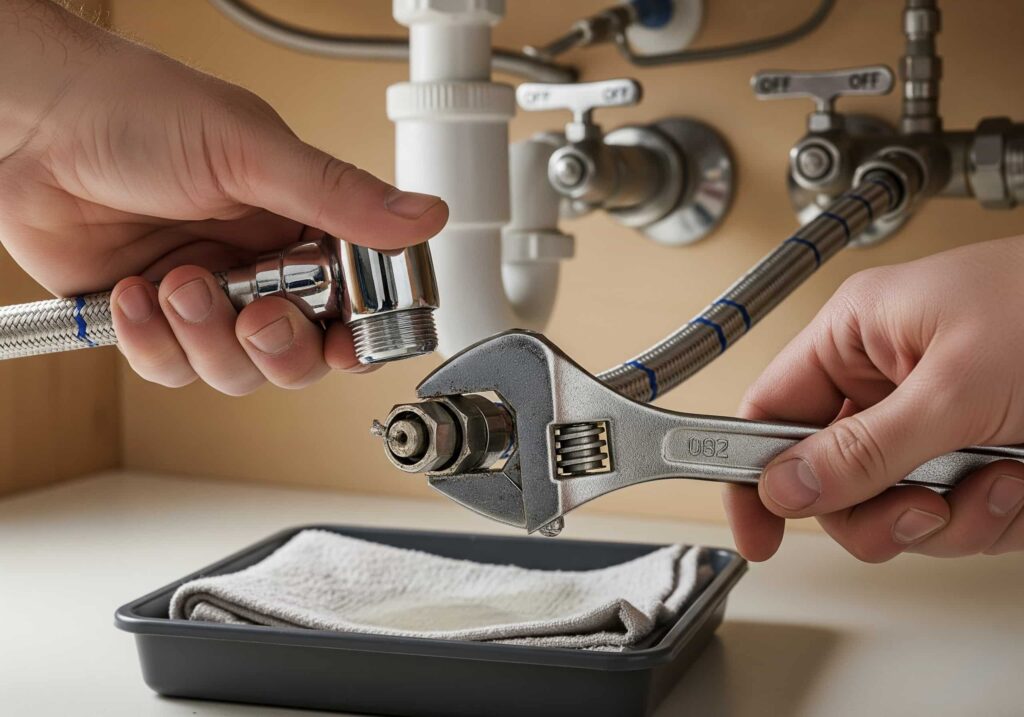
Tools You’ll Need + Safe Isolation (with fewer swear words)
Before we get spanners-out, a quick pit stop. The aim is a dry floor and, calm heart rate.
You’ll need: a small adjustable spanner (two is better), a bucket or tray, a tea towel (sacrifice one to the plumbing gods), a torch, and new WaterMark-certified flexi hoses of the correct length (no tight bends) and thread type.
If your angle stop (mini stop valve) is ancient or seized, plan to replace that too—otherwise you’re building a new house around an old tap.
Isolate safely:
- Turn off the local mini stop valves under the sink/behind the loo (slot-head or quarter-turn). If they won’t budge, isolate at the house, stop the tap at the meter.
- Depressurise: open the tap/mixer for a few seconds, then close it.
- Slide a tray under the hoses. A dribble is normal; a fountain means you didn’t isolate—happens to the best of us.
Quick sanity check: If anything electrical lives under that sink, stop and call a pro. Water and power are not friends.
Step-by-Step: Swap a Flexi Hose (The Calm Way)
- Photograph the setup. Future-you will love the reference.
- Crack the top connection first (at the tap/mixer tail). Hold back with a second spanner so you don’t twist the fitting.
- Undo the bottom connection (at the angle stop). Expect a spoonful of water—catch it in the tray.
- Inspect the old hose. If the washer fell out or the cone is chewed, you have found your culprit.
- Fit the new hose—hand-tight to start. Route it in a gentle loop; no kinks, no hard twists, no rubbing on sharp edges.
- Tighten to snug, not gorilla. Quarter-turn past firm is plenty. (Most flexi connections have their own rubber washer—don’t add PTFE tape to those female swivel ends.)
- Turn the water on slowly at the mini stop or meter. Watch each joint for 60–90 seconds. If you see a bead, nip it 1/8 turn—no more.
- Run the tap hot and cold. Re-check for weeps after a few minutes and again in an hour.
Red-flag moments (call a plumber):
seized or crumbling mini stops, green crust on copper stubs, cross-threaded fittings, or movement in the tap body when you tighten. That’s how “quick job” turns into “weekend saga.”
Prevention That Actually Works
- Replace every 5–10 years (earlier if you see heat, kinks, or corrosion).
- Use WaterMark-certified hoses with date tags and full stainless ferrules.
- Fit or service mini stop valves so you can isolate quickly next time.
- Keep hoses off sharp edges, motors (dishwashers), and power points.
- After any reno or appliance swap, re-check in 24 hours, then monthly for three months.
Because here’s the thing: the cheapest part under your sink is the one most likely to drown your cabinetry.
Sizes, Threads & Parts Cheat Sheet
Buying “any old flexi” is how you end up back at Bunnings before lunch. Here’s the plain-English guide so you grab the right hose the first time.
Typical Aussie sizes (BSP threads)
| Where it connects | Common thread | What that means | Notes |
| Mini stop valve (under sink/loo) | ½” BSP male | Your hose usually needs a ½” BSP female swivel at this end | Most domestic stops are ½” |
| Basin/kitchen mixer tails | ½” BSP male or ⅜” BSP male | Your hose must match the mixer tail (½”) or use a ⅜”→½” adaptor | Check the mixer spec/label |
| Toilet cistern inlet | ½” BSP (varies by brand) | Usually a ½” BSP female hose to the stop valve | Some cisterns have a captive hose—confirm first |
| Washing machine taps | ¾” BSP male | Use a dedicated WM hose (¾”) supplied with the appliance | Don’t substitute generic flexis |
Lengths: 300 mm, 450 mm, 600 mm are common. Choose the one that gives a lazy loop—no stretching, no tight radius.
Washer types: Most flexi hoses have built-in rubber washers in the swivel nuts. That means no PTFE tape on the female swivel. Use tape only on male-threaded joints that rely on tape (e.g., adaptors), not on compression seats.
Quick shopping list (copy/paste)
- WaterMark-certified flexi hoses (correct thread and length)
- ⅜”→½” BSP adaptor (only if your mixer tails are ⅜”)
- New mini stop valves (if yours are seized/leaking)
- Two adjustable spanners, a small tray, a torch, tea towel
Troubleshooting after install (why is it still weeping?)
- Bead at the swivel nut? Nip ⅛ turn. Still weeping? Check that the rubber washer isn’t nicked or missing.
- Weep from the tap body when tightening? You’re twisting the mixer—use a second spanner to hold back.
- Slow drip hours later? Heat-cool cycles can settle joints. Recheck and nip once—don’t over-muscle it.
- Persistent drip at a fresh washer/cartridge? The valve seat may be pitted—time for a licensed plumber.
Tip: Label the new hoses with the install month/year (Sharpie on a tag). Future-you will thank you when it’s time to replace, not guess.
One-Minute Flexi Hose Inspection (Set a timer)
- Open the cupboard — torch on, tray ready.
- Eyes on the braid — any bulges, frayed wires, or rust/green crust at the nuts?
- Feel the loop — hose should make a lazy curve, not a kink or tight bend.
- Dry-wipe test — run a tissue around each joint; any damp mark = a weep.
- Date check — tag or install note older than 5–10 years? Treat as due.
- Mini stops — do the little isolation valves turn smoothly? If seized/leaking, plan to replace.
- Clear the hazards — keep hoses off sharp edges, appliance motors, and power points.
- Snap a photo — log today’s condition for easy re-checks later.
If you spot a bulge, fray, or corrosion: replace now. Don’t wait for “after the weekend” — that’s when they burst.
Quick FAQ
How often should I replace flexi hoses?
Plan for 5–10 years, depending on heat, water quality, and installation. If there’s no date tag or it looks tired, replace it on sight.
Can I reuse an old flexi if it “looks fine”?
No. Reusing is asking for a mid-shower fountain. Fit new, WaterMark-certified hoses every time.
Do I need PTFE tape on flexi hose connections?
Not on the female swivel ends — they seal with rubber washers. Use tape only where a male thread relies on it (e.g., certain adaptors/mini stops).
Why do they burst under sinks so often?
Heat + humidity, tight bends, vibration, and age. A cupboard is basically a steam room for hoses.
My mini stop won’t turn — now what?
Isolate the house stop tap (meter), then have the mini stop replaced. Forcing it can snap the spindle and turn a drip into drama.
Can insurance cover a burst flexi?
Often, the damage, yes, not always the faulty hose itself. Insurers love maintenance logs — those photos and date tags help.
Is replacing a flexi legal as DIY?
Basic like-for-like swaps are commonly done by homeowners, but rules vary by state and job scope. If you’re unsure — or if there’s gas, hot-water unit work, concealed pipework, or compliance involved — use a licensed plumber.
It’s weeping after my install — how tight is “tight enough”?
Snug, then about ¼ turn. If a bead persists, nip another ⅛. Still weeping? Check the washer isn’t nicked and confirm the threads match. Don’t gorilla it.
Keep Hoses Happy, Cupboards Dry
Flexi hoses aren’t heirlooms — they’re consumables. Treat them like wiper blades: check them regularly, replace them before they fail, and carry a spare. Do that and your cupboards stay blissfully boring (in the best way).
Do this every quarter (60 seconds):
- Open the doors, torch on. Look for bulges, frayed braid, rust/green crust at the nuts, tight bends, or brown stains in the cabinet.
- Run a tissue around each joint; any damp mark = a weep.
- Spin the mini stop valves so you know you can isolate water in a hurry.
Replace smart (and once):
- Swap in pairs (hot + cold) and use WaterMark-certified hoses sized for a lazy loop — no kinks, no stretching, no rubbing on sharp edges.
- Tighten to snug + ¼ turn (most swivel ends seal on their own rubber washer). Turn the water on slowly, watch each joint for a minute, then recheck in an hour. If a bead forms, a tidy ⅛ turn usually fixes it.
Document & prep:
- Take before/after photos and tag each hose with the install month/year.
- Note where/what you installed (e.g., “Kitchen mixer 450 mm, ½” BSP, Mar 2025”).
- Keep a spare set in the same cupboard with two small adjustables, PTFE, and a towel.
Call a pro when:
- Mini stops seize, a mixer twists as you tighten, there’s green crust on copper stubs, or mystery damp keeps returning.
- You’re unsure about threads, connections, or anything near power. That’s licensed-plumber territory.
Quiet prevention beats noisy cleanup. Build the habit, keep the loop lazy, and cycle flexis every 5–10 years (earlier if they look tired). If you want a plain-English sense check — or help when the job goes from “quick” to “hmm” — Contemporary Plumbing is a solid place to start.